Crystalfall – Quest Guide + FAQ
Stuck on a Quest? Here’s the Solution!
Welcome to the quest guide for Crystalfall! While we encourage exploring and discovering the game’s secrets on your own, sometimes we all need a little nudge in the right direction. When you’ve searched every corner and still can’t progress, these hints will get you back on track.
Let’s begin with Act 1, where your journey in Crystalfall starts…
Act 1: Prison Island / Arcadia
Prison Break
- Talk to the automaton to unlock the door.
- Run through Isolation Cell Block and click the chute to exit.
- Talk to rat prisoner at the beginning of Prison Island.
- Run through the Prison Island until the exit to encampment.
Find the prisoner
- Enter the Prison Island from the northern exit in the encampment.
- Run through Prison Island until you reach the open gates before the first waypoint.
- Talk to the rat NPC named Ratchit.
- Rat mobs will enter from north of the gate. Kill the mobs.
Bandit repellation
- Kill the rat mobs just north of the waypoint.
- Kill the rat mobs straight west from the waypoint.
- Destroy the crates located northwest of the gate before the bridge.
- Destroy the crates located on the bridge just northeast of the first crates.
- Run north through the second open gates straight until you reach the second waypoint.
Find the prison entrance
- Run north from the second waypoint until you reach the prison entrance.
- Quest will auto-complete when entering Shadowgate Prison.
The Overseer
- This quest will auto-accept quest when entering Shadowgate Prison.
- Kill the automaton sitting in the control room close to the entrance.
- Run through all three prison levels.
- In the last block in the prison level named “Torture Chamber” you will find the boss Vex. Kill him.
Capital Arcadia
- Interact with the terminal just north of Alden Sage in the encampment by the ship harbour, click on Arcadia to travel to Arcadia harbour.
- Go to the east and enter the police station building, talk to the commissioner npc.
Forceful Withdrawal
- Go to the bank building straight west of the police station.
- Go inside the bank and click the bank dungeon entrance.
- Run through the bank levels until the last block where you find the boss Ratgar. Kill him.
Tools of the trade
- Go to the merchant automaton NPC in the building just north of the Arcadia waypoint.
- Interact with each of the two NPC and perform the different tasks.
- To upgrade a skill, ctrl+right-mouse-button click a skill in your inventory or actionbar to open the skill UI, click a skill-tree node to upgrade a skill (you will need skill keys that is lootable).
Tumbleweed Express
- Go to the terminal by the Arcadia harbour.
- Interact to open the UI and click on Red Plains to travel to Red Plains encampment.
- Talk to Alden Sage who stands just east of the small town.
Act 2: Red Plains / Temple / Arcadia
Local Plight
- Go to the east in the encampment and click the exit.
- When in the Badlands, run to the middle south parts, not at the very lowest area, and find the fox NPC.
- Interact with the NPC and the raiders is spawned in the area around the nomad camp.
- Run around and kill 15 of the raiders.
The Crystal Mines
- Go to the Badland’s northern tip to find the exit to the next area Crystal Chasm.
- When in Crystal Chasm, run west until you reach the crystal mines entrance in the mid-southern parts of the area.
- Enter the mines and go to the lowest level and run to the last block.
- Kill all three automatons that have the naming specified in the objectives.
Rescue party
- Go to the northern tip of the area to find the exit to Wreckage fields.
- When in Wreckage Fields, go to the north-west to find the small harbour.
- Kill the rare hauler that stands close to the harbour.
- Interact with the tied-up NPC sitting close to the harbour.
Cleaning up the Junkyard
- Go to Wreckage Fields.
- Kill the mobs standing in the southern parts of the area across the bridge (there will only be a few quest targets).
- Go to the small harbour north-west and destroy the crates just below the ship.
Ruins of Old
- Go to the northern tip of Junkyard to reach the Redrock Peak.
- When in Redrock Peak, go to the northern tip to find the Forsaken Temple dungeon entrance.
- Quest will auto-complete when entering.
Guard of Secrets
- Will auto-accept quest when entering Forsaken Temple.
- Go to the second level and to the last block to find the boss Cogblade. Kill him.
Where’s Haddock
- Go to the encampment terminal to travel to Arcadia.
- Interact with the captain NPC in the Arcadia harbour.
Stealthy retrieval
- Go to the bank building in the north-west direction.
- Follow the bank exterior to the west to find the NPC Ray.
- Interact with Ray and a crate will start glowing just above him.
- Click the crate and you will travel to the bank’s top floor.
- When in the bank’s top floor, go find the interactable chest and interact with it.
- Find the dungeon exit or use a portal to get back to Arcadia.
A shipload
- When accepting the quest, a crate just beside the captain starts to glow, click it to travel to Fallen Metropolis.
- When in Fallen Metropolis, go to Alden Sage which stands in the encampment.
Act 3: Fallen Metropolis / Subway
Prove your worth
- Go to the east in the encampment and click the exit to go to Eroding Stream.
- When in Eroding stream, go to the north-east until you find the exit to Blighted Plains, and click the exit.
- When in Blighted Plains, go to to mid area to find the NPC Proudfang.
- Interact with Proudfang to enable the objective to find The Crater dungeon.
- Go straight north from Proudfang to find the entrance to the dungeon.
- When in The Crater dungeon, kill all the mobs named “Moledogs” until all is dead.
Hunt for the treasure
- Go to the east in the encampment and click the exit to go to Eroding Stream.
- When in Eroding stream, go to the north-west until you find the exit to Dead Woods, and click the exit.
- When in Dead Woods, go to to northern parts to find the entrance to the dungeon Crumbling Cavern, enter the dungeon.
- Go to the lower level and search for a specific block that has the treasury chest and automaton guards. Kill the guards.
- Loot the treasure.
Join the force
- Go to the east in the encampment and click the exit to go to Eroding Stream.
- When in Eroding stream, go to the north-east until you find the exit to Blighted Plains, and click the exit.
- When in Blighted Plains, go to north-east until you find the exit to The Lost Highway, and click the exit.
- When in The Lost Highway, go to the far East until you get to the eastern bridge, there you will have to kill all ambusher automatons.
- When all ambushers are killed, interact with Proudfang lying on the ground near the eastern bridge.
- Go to the north-east until you find the exit to Underground Tunnel dungeon, enter the dungeon.
- When in the Underground Tunnel, Go to the last block to find the exit to Ghost Town (not the exit to the Underground Tunnel lower levels).
- When in Ghost Town, go to the north-east until you find the entrance to the Old Subway, and enter the dungeon.
- When in Old Subway, find the block where the generators are located, and click on the smaller generator in the corner in one of the rooms.
Safe Passage
- Go to the east in the encampment and click the exit to go to Eroding Stream.
- When in Eroding stream, go to the north-east until you find the exit to Blighted Plains, click the exit.
- When in Blighted Plains, go to north-east until you find the exit to The Lost Highway, click the exit.
- Go to the north-east until you find the exit to Underground Tunnel dungeon, enter the dungeon.
- When in Underground Tunnel, Go to the last block to find the exit to the lower levels (not the exit to the Ghost Town).
- Search for the block where the group of rat highwaymen is located. Kill all highwaymen.
To the City
- Go to Ghost Town and search in the north-east until you find the entrance to the the City Ruins, click the exit.
- Go find each subway dungeon entrance without entering, when outside the correct one the objective that indicates the correct subway dungeon entrance is found will be complete. Enter the dungeon.
- Quest will auto-complete when entering the correct subway dungeon on the lower level.
Race for the tunnels
- Will auto-accept quest when entering City Ruins.
- Search the city for the correct subway dungeon, there will be several that are not correct. The correct one will only be clear to you in two ways; First alternative is to follow the “To the City” quest until the objective indicates the correct entrance is found. The second alternative is to search all subway dungeons until the correct one is found. When the correct one is found, you will encounter the boss Talon in the last block. Kill him.
Act 4: Northern Lands / Foundry
Disturbances
- Go to the encampment exit to the east, click the exit to get to Castle Ruins.
- When in Castle Ruins, go to the mid-northeast until a dungeon entrance is found, enter the dungeon.
- When in the prison dungeon, find the block where the mini-boss Deathbringer is located. Kill him.
- Exit the dungeon and go to the entrance again, there you’ll meet a wolf NPC, talk to the NPC.
Back to sleep
- Go to the far north to find a cave entrance, and talk to the NPC standing outside of the entrance.
- Go to the lower dungeon level to find the mini-boss Awakened Creature. Kill it.
Wolf commandment
- Go to the Cross Roads from Castle Ruins.
- When in Cross Roads, go to the north until you find the exit to Wolf Woods.
- When in Wolf Woods, go straight east from the waypoint a short distance until you find the wolf NPC, talk to the NPC.
- Go to the far north until you find the entrance to the Ice Cavern dungeon, enter the dungeon.
- Find the lower levels.
- Quest will auto-complete when entering the Ice Cavern lower levels.
Secret location
- Will auto-accept quest when entering the Ice Cavern lower levels.
- Go to the lowest level and the last block, where you will find the boss Dr. Aetherius. Kill him.
Gameplay FAQ
Which blockchain is this game on?
Crystalfall is on BEAM, subnet on AVAX.
How can blockchain be used to enhance the game?
You need other players to be online to give value to your items which is equal to your wealth progression. This is the foundation of any game economy among players and needs to be secured to avoid hacks and duping that can impact wealth progression and economy in a negative way. Blockchain as a technology helps players to trade freely among each other without prior history of doing so without having to worry about being scammed. It also helps with traceability as items shift hands among players in an economy created by players for players.
Trading items is optional and is not a requirement to have fun and play the game.
Can this be solved in other ways with other technologies?
If the focus is to create an open economy driven by players for players avoiding traditional closed ecosystems then this technology provides the best solution.
But the technology has friction and complexity to it?
CRG has worked together with our technology partners to deliver a seamless way for players to enjoy the sealing of items and trading among themselves. More about this will be revealed closer to global launch.
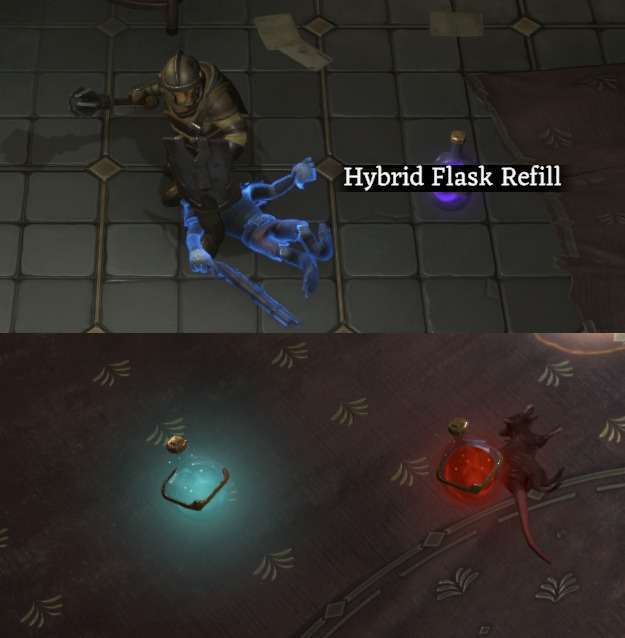
Why can I not pick up flasks?
If you encounter red, blue or purple shining flasks that you can’t seem to pick up, the reason is most likely your flasks are already full. These are flask refills, and they go immediately into your flasks in the action bar automatically when running close to them if there is anything to fill up. To use your flasks, press hotkeys 1-5.
Why can I not insert Skill Crests into the Skill Tree?
- (1) Make sure the Skill Crest socket is unlocked, if the tooltip states “Active” and “Unallocated” you are good to go.
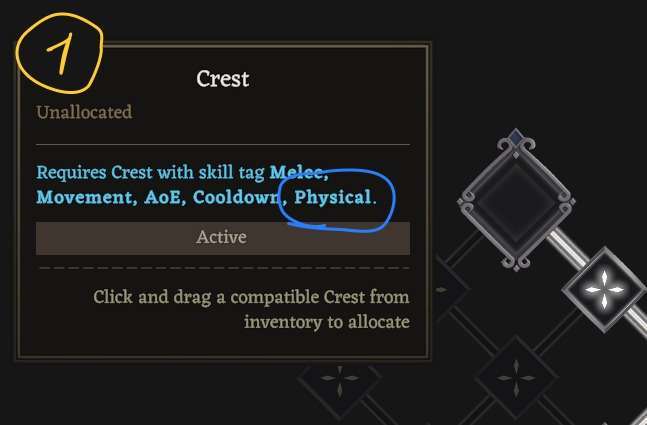
- (2) Make sure the Skill Crest you want to insert is compatible with the socket by comparing their tags, in this case here Physical works.

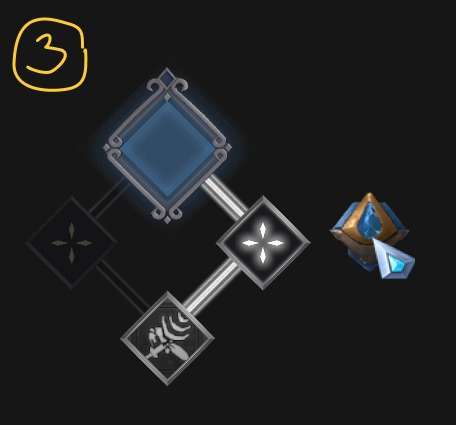
- (3) As soon as you pick up a Skill Crest on the cursor that is compatible with a socket, the socket will light up in blue.
How do seasonal resets work?
The game will run in seasons, where the apocalyptic event Nexus will strike and destroy the world of Crystalfall, forcing its citizens to start over. Each season thus ends with an economic reset that wipes out everything except sealed items on the blockchain. These sealed items can be brought back into another season but have to go through something called resurgence in the game. Meaning that players will not be able to start with these items at level 1. More about resurgence will be revealed closer to global launch.

For the quest to the city and race for the tunnels i feel like it can lead up to a lot of confusion since you can interpret the second one as going into every single entrance you see on the area until you find the correct one while inside the sub areas leading to alot of frustration and tediousness…