Ragnarok Landverse: Genesis – Helpful Tips You Didn’t Know

Useful Tips and Tricks for Beginners
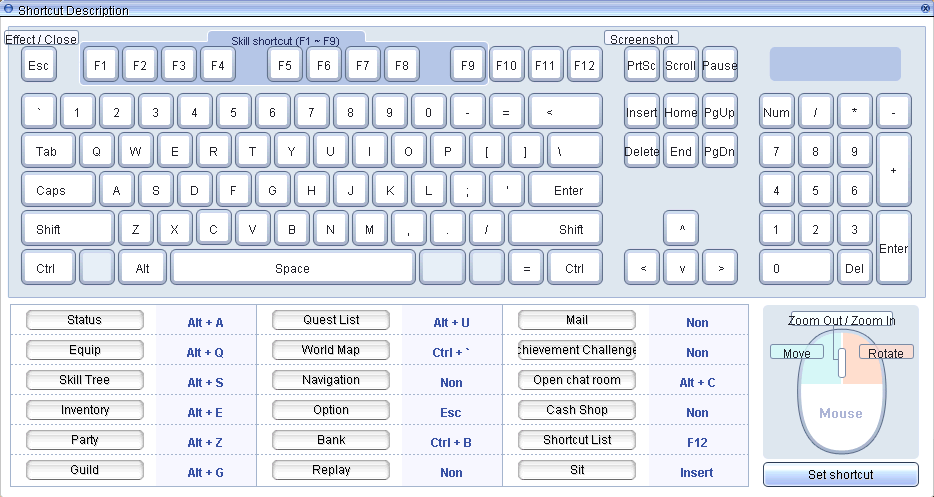
Basic Control
To see the description of the Shortcut, just click the Quick Menu button in the top left corner of the screen.
Click to enlarge…
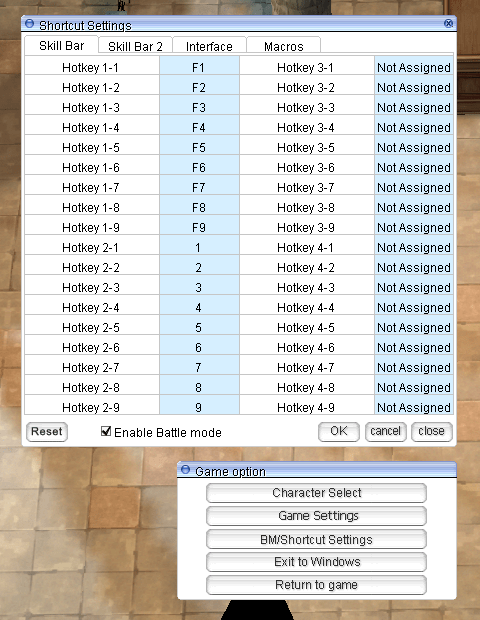
Setting Shortcut Keys
In-Game Commands
Here are the in-game commands and what they do:
- /noctrl or /nc: Lets you attack monsters continuously after just one left-click.
- /noshift or /ns: Allows using support skills on monsters or other players in PvP zones without needing to hold the Shift key.
- /organize: Creates a new party. Your character needs to be Job Level 7 or higher to use this.
- /invite: Sends an invitation to another player to join your current party.
- /leave: Lets you exit the party you are currently in.
- /where: Displays the name of the map you are currently on and your specific coordinates.
- /quake: Turns the screen shaking effect on or off.
- /effect: Turns the visual effects for all skills completely on or off.
- /mineffect: Switches skill visual effects to a simplified, minimal version, or back to normal.
- /savechat: Saves the current chat log to a file.
- /exall: Blocks incoming private messages from all players.
- /inall: Removes all players from your private message block list.
- /aura2: Turns off the special visual aura effect shown by level 99 characters.
- /aura: Turns on the special visual aura effect for level 99 characters.
- /emblem: Toggles guild emblems on or off, so you can choose whether to see them.
- /guild: Use this to create a new guild with the name you specify. You must have an Emperium item in your inventory.
- /breakguild “Guild Name”: Deletes the specified guild. Only the guild leader can use this command, and the guild must have no members left.
- /blacksmith: Shows a server list of the top 10 Blacksmith characters ranked by their forging or upgrading achievements.
- /pk: Shows a server list of the top 10 players based on the number of other players they have defeated.
Leveling Route / Farming
Levels 1-8: Training Ground.
Levels 8-20: Spore, Snake, or Wormtail – good loot includes strawberries and Tier 4 cards.
Levels 20-35/40: Bigfoot – you might get lucky and get a Poo Poo Hat or Creamy Card.
Levels 40-55: Coco/Horn, or you can also use your stamina and level up in Soldier Skeleton/Archer Skeleton.
- Soldier/Archer Skeleton = Greatbow [3], Armor of Anguish (AoA), Stiletto[2], and Cards.
- Coco/Horn: Sandals[1] & Hood [1], and Cards.
Levels 55-65/70: Golem or Sohee – Golem = Good Experience, Fewer Loot / Sohee = Medium Experience, Better Chance for Loot.
- Sohee = Puente Robe & Muffler[1]
Levels 70-80: Sidewinder – you might get lucky and get a card.
Levels 80-85: Petite – decent loot; you can also loot Sidewinder and Mantis cards.
Levels 85-100: Glast Heim Underprison Level 1 or Turtle Dungeon – GH Under = More Loot, Good Experience / Turtle Dungeon = Less Loot, Good Experience.
Experience Rings are vital. Hallow Rings are recommended for Glast Heim. Clamorous Rings are recommended for Turtle Dungeon.
- Glast Heim drops include Rybio Card, Injustice Card, & Hunter Fly Card.
- Turtle Dungeon drops include Pest Card.
Always join a party; the more members in the party, the better. Use your stamina wisely. Check monster stats and drops at ratemyserver.net (be sure to click “Renewal”).
Vanilla Leveling Tips
Make way to the training ground (do not skip):
- Shion: Talk to her twice to get 1 base level.
- Interface Tutor [Kris]: Talk to get 1 base level and 1 job level.
- Item Tutor [Alice]: Talk to get 2 job level.
- Kafra Employee: Talk about Save Services and Storage to get 1 base level and 1 job level.
- Skill Tutor [Cecil]: Talk to get 1 base level and 2 job level.
- Helper [Elmeen]: Talk to get 1 base level.
Reaching this point, you will be level 6 with job level 7. Make your way to the training ground. Firstly, allow your character to be defeated once you arrive. This will instantly grant you an additional novice potion and an extra level.
- Base Level: 7
- Job Level: 7
Explaining how stats work:
- STR: Grants ATK for your “short-range” attacks and increases your Weight Limit.
- AGI: Grants ASPD and Flee.
- VIT: Grants HP and Def.
- INT: Grants SP, MDEF, and MATK (reduces cast time in conjunction with DEX).
- DEX: Grants HIT and ATK (optimal for Archers – Long Range, reduces cast time in conjunction with INT).
- LUK: Grants ATK, Crit Rate, and Flee.
Stats Assignment:
Each class has its own respective pros and cons, with Swordsmen possessing a good HP pool and Mages delivering strong burst damage but being more vulnerable. Choosing a class depends on your play style and your desired role.
Beginning Stats Suggestion:
- DEX: 11
- STR: 24
(Don’t worry, adjustments can be made later).
Having this initial stat distribution will allow you to easily level up to 22-24 by primarily defeating Poring, Drops, Lunatic, and Chonchon.
“Fast Kills, Faster EXP”
It is suggested to level up until 24 so that you can equip a suitable weapon after the Novice Area and have a good stat distribution for your chosen class. After reaching your desired level, you can now select your respective class. Following your class selection, proceed to Prontera to reset your stats. (You have a free stat reset available until level 40, so utilize this opportunity). While focusing on your initial leveling area, you can consult the website’s monster database to check monster levels.
Okay, I’ve reviewed the leveling spots you’ve provided. Here’s a slightly adjusted and formatted list for clarity:
Leveling Spots:
Alternative Paths (Levels 21-50):
- Option 1 (Levels 21-41):
- Peco-Peco: Levels 21-31
- Creamy: Levels 21-31
- Horn: Levels 31-41
- Option 2 (Levels 41-51):
- Andre: Levels 41-51
- Coco: Levels 41-51
- Option 3 (Levels 21-50):
- Zombie: Levels 21-31
- Soldier Skeleton: Levels 31-50 (until Job Level 50)
Byalan Island Dungeons:
- Grove: Levels 50-65
- Golem: Levels 55-65
- Hode: Levels 55-65
Later Leveling:
- Petite: Levels 70-85
How to Get to Turtle Island
Here’s how you get to Turtle Island. You’ll need 10,000 Zeny for the trip.
- Go to the inn in north Alberta. You can find it at the coordinates [/navi alberta 65/233]. Once you’re inside, go into the room on the right.
- Inside that room, talk to Grandpa Turtle at [/navi alberta_in 23/104]. Choose the dialogue option “How can I get there?”.
- After talking to Grandpa Turtle, go find the Sailor in Alberta at [/navi alberta 247/119]. Talk to him and select “How can I get there?”.
- The Sailor will offer to take you to Turtle Island for 10,000 Zeny. Pay him, and you’ll be on your way.
How to Create Guild
Go to the Guild Contribution NPC to buy an Emperium. The NPC is located in Aldebaran at coordinates 75, 154 (on the left bridge).
Then, use the following command (type it into the chat box) to create a guild:
/guild "Guild Name"Replace “Guild Name” with the name you want for your guild.
Optimal Execution of Quests
Instructions for optimal execution of quests Ragnarok Landverse:
- Create a hero who will serve as an example of an archer.
- Complete the training provided by NPCs to become an archer.
- Allocate stats with 70% to Agility (AGI), 20% to Luck, and 10% to Dexterity (DEX).
- Choose the optimal spot: PRT_FILD07.
- Enter all the codes on the website that provide bonuses.
- Activate all the codes found and then turn on auto-combat, preconfigured to your preferences. It is flexible enough to handle minor tasks automatically.
- At the location, perform Lesson 1 (in-game quests can be found in the “achievement-quest” tab).
- Go to the city of Pajon, to the area with NPCs where you can repair equipment (shmot) in the traders’ building. They buy and gradually upgrade our bow.
- Proceed to level up (kacha) in a party. Look for suitable parties with the largest number of people, and ensure that the “expa-share with everyone” checkbox is enabled in the party settings. Level up at AFK spots where you don’t consume many potions with experience points. This will guarantee that you can leave your character AFK and check the level and upgrade equipment every few hours.
- In Pioneer, find a refine master. Have them upgrade our level 40 gear all the way to +5 and then go to the archer master to become a hunter. Buy a normal bow and try to upgrade it to +7 and your gear to +5.
- Obtain Moonstone tokens in the test network, and our task is to acquire all skins and gear for the set, as well as the necessary rings.
- Acquire a rare (rng) pet with the required stats; Bahomet Jr. should work fine. You can decide for yourself.
- Do Lesson 3 – the names coincide with the location; you will find it on the map, it’s not difficult.
- After looting to level 50, go to Izlude and do dailies. By the way, you need to do 15, but starting with 3 is enough, depending on your mood.
- Forgot to mention, we have stamina. With its help, you can level up faster. It can be bought in the Moonstone shop, and you can also get it from dailies in Nova Space at the cat, near the NPC that gives a buff to stats; you will find it easily.
- Nova Space is your assistant. Use the book to teleport there so you don’t have to run to the city and buy consumables.
- Lesson 4 will not cause any questions.
- In general, by this point, you will already understand how and what to do. Further, you will need to open the book and teleport (tepnitsya) to the rift. There, buy a pickaxe and extract 50 ore; after that, kill 300 mobs – this is Lesson 6.